mardi, 12 juin, 2018
The Seaver girth and girth sleeve calculate the height of all of the horse/pony’s jumps during a session. The device has no way to know the height of fences or that of the horse’s forelegs. The measured height is thus that of the girth (or more precisely that of the device’s sensor), meaning the height of the middle of the horse’s sternum at the peak of the jump trajectory.
It is possible, if the place of take off was not ideal, if the horse is still green and in training, or if the horse was surprised/did not properly estimate the jump, that the peak of the trajectory may be slightly off, which would usually further increase the height jumped by the horse in comparison to the height of the fence.
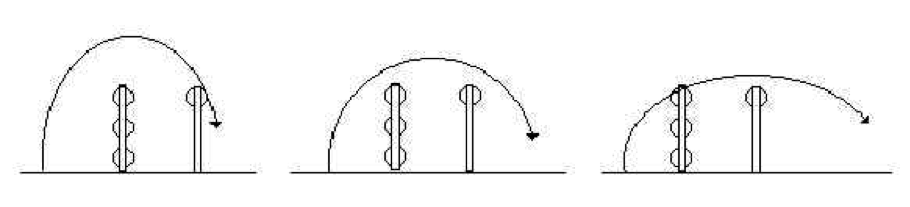
Left: the peak of the trajectory is before the top of the jump, this is a high trajectory with the horse rising high into the air and having difficulties covering the length of the jump; the resulting jump height will be high – Middle: classic jump parabola; the jump height given will be normal – Right: the parabola shifted to the back of the oxer; the height given will be low, closer to the actual height of the fence.
Depending on the generosity and the ‘jumping’ style of the horse particularly regarding the forelegs, the sternum will rise more or less above fences. For the same fence jumped clear, two different horses can absolutely jump at different heights that can vary up to 80 cm.
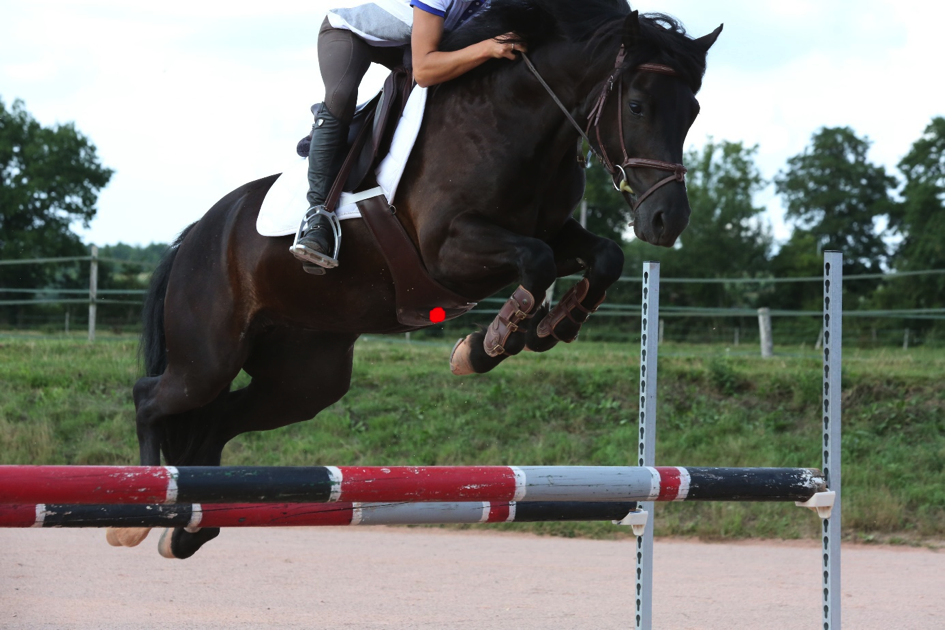
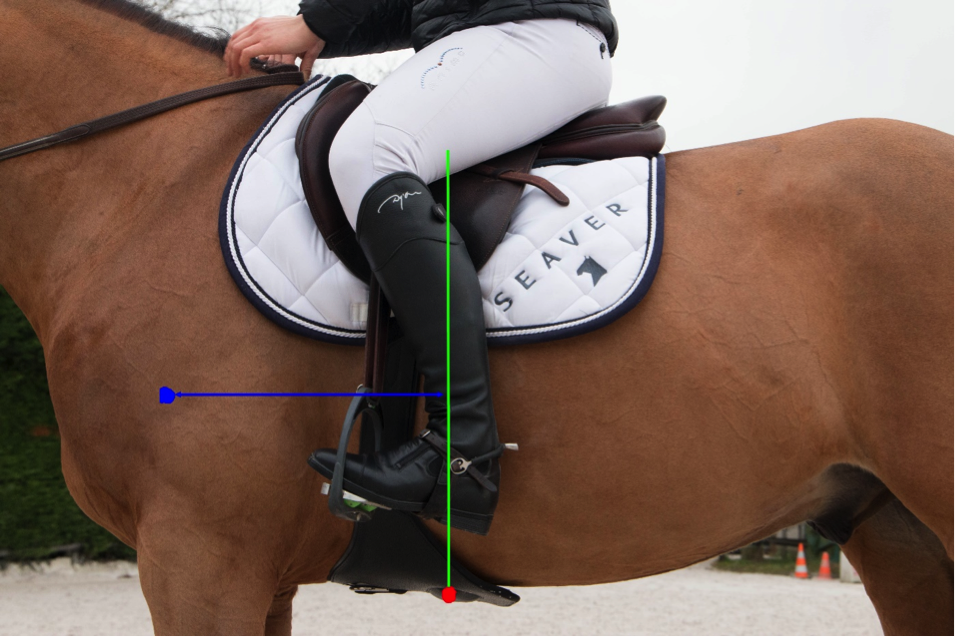
Here we can see that the sensor (red point) goes far above the because of how high the pony is jumping and the way he tucks his forelegs in. Plus, he is still in the ascending phase and will rise even higher.
For a clear jump, the sternum will go from 15 cm (for forward and flat trajectory with forelegs tucked in) to 75cm above the fence on average. With a young horse who was surprised by the jump or a high jump, the height difference can be even higher.
The point of this data is to quantify the effort provided by the horse. The height of the jump is of course not the only relevant data, but it does give a good indication on the energy required by the horse to rise and jump the fence and it also enables riders (as they usually know the approximate height of the fence) to understand their horse’s jumping habits and capacities.
Sometimes, a rider may be distorted by sensations of power and speed when riding an energetic horse with a good propulsion and thus overestimate the height at which the horse jumped, or on the contrary underestimate the height at which a less tense horse jumped.
The sensor allows the objective quantification of this data, to which riders would otherwise only have access through a video analysis with prior calibration.
It is important to note that jumps under 70cm might not be detected if the horse does not have a real bascule movement while going over the jump and ‘swallows’ it in his canter stride. On the contrary, a very expressive flying change or a big buck might be interpreted as jumps by the device. On cavalettis, with a horse that articulates correctly, it is not unusual to obtain jump heights in the order of 110 cm.
Indeed, as the girth is already at about 80 cm of the ground depending on the horse/pony’s size, when a horse goes over a 30 cm cavaletti really articulating his body and raising his withers will draw a nice jumping parabola by elevating his sternum of about 30 cm, and the device will thus detect a jump of 80 + 30 = 110 cm.
Jumps in varied terrains, and particularly jumps with the landing lower than the take off, such as downhill jumps, drop fences, banks, etc. can distort the calculation of jump heights. Indeed, as they are estimated from the heights of the peak of the trajectory and the landing, they are thus too high in these cases. On the contrary, uphill jumps and uphill banks might be underestimated.
The required measurements to create a horse in the application are essential for the algorithm that determines jump heights. If they are not properly taken and recorded in the app, or if you choose to keep the preset settings of the application when you create your horse’s profile, the results provided by the algorithm might be distorted. Indeed, our algorithms adapt to this measurements to give you precise and accurate data, as adapted to your horse as possible.
Two of them are particularly important; the girth height and shoulder-girth length measurements.
To know the girth height; bring your horse on a flat and even ground, and get him to stand as straight as possible (a square halt is ideal, but as long as the forelegs are at the same level it is ok). Hold the measuring tape vertically behind the forelegs and measure the distance between the casing of the girth and the ground. This measurement is usually between 60 and 80 cm for horses of an average size (160 cm at the withers) but it will vary greatly depending on the size and morphology of the horse.
Note: it can be tough to maintain the measuring tape vertical, so try to find someone to help you make sure it is not tilted.
The second essential measurement for this algorithm is the shoulder-girth length. Once again, the horse should be standing straight on an even ground. Place your finger on the middle of the casing, and go up vertically to shoulder level, following the belly. Then, measure the distance between this point and the middle of the horse’s shoulder. Get someone to help you make sure the measuring tape is horizontal.
This measurement will usually go from 25 to 50 cm for average-sized horses. It can vary depending on the morphology of the horse and equipment used (girth and casing more or less close to the shoulders depending on the type of girth and saddle you have).
Tip: taking these measurements on a tacked up horse will help better visualize the position of the casing.
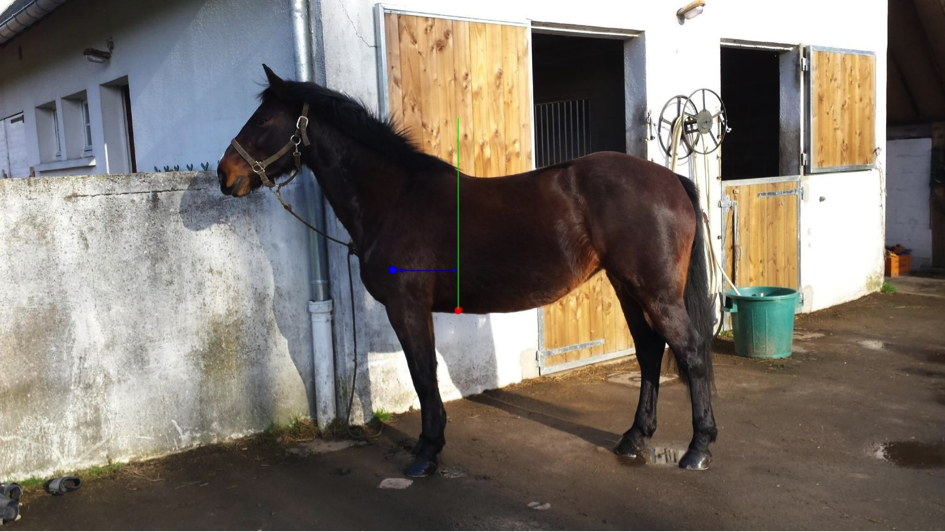
Casing in red, vertical line from the casing in green, middle of the shoulder in blue, distance to measure = blue arrow, parallel to the ground. Horse standing straight on flat ground.
Same color code. Here we can see that the casing is further back on these types of girth than on the previous picture. The distance is thus bigger (the horse is also taller). Measuring a tacked up horse is advised if you have a doubt.